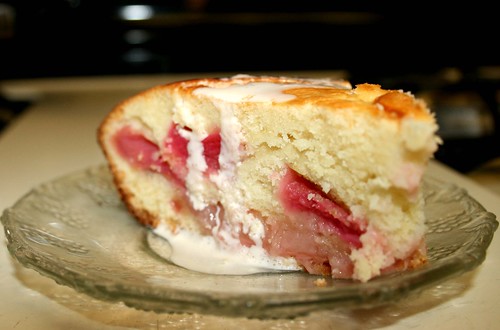
Essentially I am vegetarian. I have been for more than two years; not because I have something against meat, but because of the way animals are treated.
However last week while browsing my local farmers market, I realized there was a farm near me, where I could buy organic free- range chicken. And I could see it; I didn’t have to rely on stamped packages flown in from far away.
So I bought one, and then came the hard part. What should I make with it? It had to be something good, but that didn’t kill the chicken flavor. It had to be something I loved, since I would not be having it for a long time. But, most of all it would have to be something I would enjoy making.
I browsed through a simple recipe book, one I bought at Wal-Mart before I entered culinary school, Potatoes and Vegetables, by Parragon Publishing, and there nestled between ham empanadas and potato bread was a pot pie. Simple, traditional, my favorite!
The recipe is a little modified from the original, but the results are to much for words.
Ingredients:
225 g potatoes (diced)
25g butter
225g chicken, (diced and sautéed)
25g all-purpose flour
300ml milk
50g carrots and zucchinis (diced and steamed)
For dough:
225g all- purpose flour
pinch of salt
pinch of cayenne
150g butter
125g crumbled blue cheese
2 egg yolks (1 extra)
4-6tbs cold water
Procedure;
1. Boil the potatoes for 10 minutes, until soft. Drain and set aside.
2. Melt butter, and sauté chicken, add flour and milk (stirring as you go)
3. Take to quick boil; add potatoes, vegetables, set aside
4. In a bowl, mix flour, cayenne, and butter until it resembles coarse meal.
5. Add yolks and water, until you form paste.
6. Extend the paste in a buttered deep-dish (or 4 individual ones). Cover base and sides.
7. Spoon filling, and extend the rest of flour paste on top.
8. Extend well with a spoon, and wash with the extra egg yolk.
9. Bake and 350F 40 minutes or until cooked and browned.
I didn’t use the chicken legs, wings, or extras in the pot pie. We boiled it Mexican style in a broth, with seasoning and onion. Nobody ate it that day (the pie was just so filing).
So, the next day I got the inspiration to make cream of chicken. It was just as delicious as the pot pie, and very memorable when served with quesadillas and guacamole.
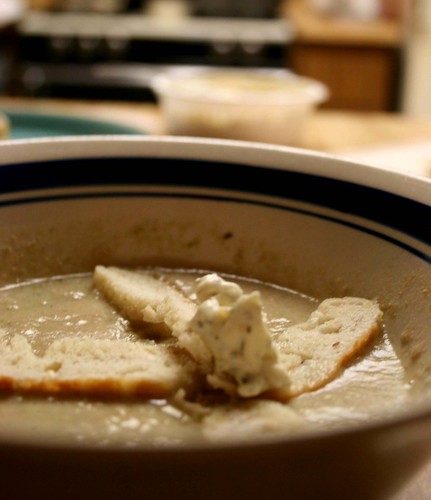
Crème de Poulet
Ingredients:
2lbs boiled chicken (from chicken broth, really soft with no bones)
1.5 qt chicken stock
1/2 onions boiled
2 zucchinis
1/4 head romaine lettuce
1tsp ground cinnamon
1tbsp hot sauce
.1tsp nutmeg
1tsp ground coriander seeds
Salt and pepper to taste
Procedure:
1. Slice zucchinis and chop lettuce, then steam for 4 minutes or until soft.
2. Once soft, put in a food processor with a few spoons of chicken broth until a smooth puree forms. Put on a large pot, set aside
3. Then put chicken and boiled onion in the food processor, 4 -6 oz chicken broth and process until smooth puree forms.
4. Combine vegetable and chicken puree, along with remaining broth and bring to a quick boil, turn down heat and simmer for 15 minutes.
5. Add spices stirring constantly. Add salt and pepper to taste.
6. Serve wart topped with croutons and cream cheese.
Yield: 4 Servings
Sunday, April 27, 2008
The Centennial Pot Pie
Labels:
baked,
blue cheese,
broth,
chicken,
chowder,
cream,
free-range chicken,
mexican,
pot pie,
soup,
vegetables
Sunday, April 20, 2008
Celebration Cupcakes!!
I like to experiment and try new recipes all the time. Sometimes they don't work and go in the trash bin, along with whatever scribbles I have made. Sometimes they work okay and we eat them out of obligation to not throw food away. And then there are times when they are great!
Needless to say those are my favorite times, the house smells wonderful, family begins to linger by the kitchen and ask "What are you making?"
The following cupcakes were a result of those triumphant days!! A couple of months ago, I substituted leftover champagne for the liquid in a simple cake-flour recipe. The results were wonderfully soft, and airy cupcakes (almost like sponge-cake).
After many request on behalf of my pastry adoring family, I baked them again today. However, we only had white wine to use.
The results were still delicious; yet, the texture was a little firmer and denser (resembling pound cake).
I love both versions, give then a try and tell me which your favorite was!!
White Wine Cupcakes
Ingredients:
8 oz butter (softened)
16 oz sugar
1.5lb cake flour (sifted)
.5 oz baking powder
½ tsp salt
4 eggs
8 fl oz white wine or champagne
3 food colors
Procedure:
1. Pre-heat oven to 350F Butter 2 8-cupcake pans
2. In a bowl cream butter and gradually add sugar until light and fluffy
3. Add eggs one at a time, beating well after each addition.
4. In another bowl sift flour, baking powder, and salt.
5. Add flour mixture alternatively with wine to mixture, beating after each
addition.
6. Pour batter into prepared cupcake pans. Pour 1 drop of desired color on each cupcake and swirl with a toothpick. Switch color after 4 or 6
7. Bake for 20-25 minutes. Cool in pans, then remove and finish cooling.
Yield: 16 Servings
Labels:
alchohol,
baking,
cake flour,
celebration,
cupcakes,
kids,
white wine,
wine
Friday, April 18, 2008
Chocolate Cake Updated
This week has really been hectic. My family arrived on Wednesday, and it took a day for them to unpack, settle and get use to the time change!!
I am also working on a recipe book for my Basic Cooking Class, its due in a week and must contain 100 recipes, plus procedures and techniques. It's kind of exhausting but I'm having fun. Some are mine, some are borrowed, and all are delicious.
I have also decided to include my Tipsy Chocolate Treat (the cake I made for my Grandma). I am proud to say everyone liked it!! It was my first "professionally decorated cake", and it tasted SINFUL on the inside.
Sadly I didn't take a picture of the one I made, but I have included the book picture, my looked pretty similar but the white chocolate was a little thicker.
The rum gives it a really grown up taste and the piped ganache makes it luscious.
It is a great looking cake, and easier to decorate than it looks!!
Ingredients:
9 squares bitter chocolate
6oz butter
6 eggs
8 oz confectioners’ sugar
4 oz self-rising flour
2 fl oz rum
For decorations:
8 squares bitter chocolate
4 oz whipping cream
4 oz butter (softened)
3 squares white chocolate
3 squares milk chocolate
Procedure:
1. Pre-heat oven to 325F. Line and grease a deep 8in round bottomed pan.
2. Melt chocolate and butter in a microwave for 30-50 seconds at a time.
3. Whisk the egg yolks with ¾ cup sugar until pale, thick and creamy. Gently stir in the cooled chocolate. Then fold in the flour.
4. In a separate bowl, whisk the egg whites until stiff but not dry. Then gently whisk in the rest of sugar. Fold whites into chocolate mixture and spoon into prepared pan.
5. Bake for 1 hour 15 minutes, until cake is well risen and springy to the touch. A knife should come out clean. Leave in pan to cool, then turn into wire rack and finish cooling.
6. Invert cake and sprinkle rum over its base. Allow to soak, turn cake right way up on the rack.
7. Prepare chocolate ganache: Heat cream in a small saucepan until almost boiling, pour over chocolate stirring until chocolate has melted and blended. While still warm, work in butter.
8. Reserve 1/3 of ganache, pour rest over cake. Make sure all cake is fallen and save the drips for later.
9. Cut a piece of foil and mark a rectangle about 10 x 13 in on it. Have a rolling pin, ready. Melt the white and bitter chocolate separately and spoon into piping bags. Drizzle white chocolate in lines across top of cake.
10. Drizzle the bitter chocolate on the foil first, then the white chocolate, keeping within market rectangle. Reserve the unused chocolate. Carefully drape the foil over pin and leave to set. When firm carefully remove pieces of the drizzled chocolate semi-circles and arrange on top of cake.
11. Transfer the cake to serving plate. Re-melt the remaining ganache and chocolate together and allow to cool until thick enough to pipe. Then pipe around the base of the cake. Keep in cool place until ready to serve.
Labels:
baking,
bitter,
cacao,
cake,
chocolate,
decorating,
ganache,
rum,
welcome cake,
white chocolate
Tuesday, April 15, 2008
Can't Sleep Exited
So, I have been totally hectic these past few days. Turns out my grandmother and aunt are coming to visti from Mexico, so we were head over heels trying to fix up the house and make it gleam.
So, we have been dusting, shopping, cutting, painting, and talking on the phone! Not, to sound to occupied but I also have school and work on top, who-hooo!
Anyway I'm super exited because they will be here tomorrow, I am leaving at 7am to go pick them up from LAX (Los Angeles International Airport). I also have been in the kitchen the last 3-4 hours baking a beautiful chocolate cake that I will write about after I taste it. It now sits in my fridge, waiting,... waiting anxiously to be eaten... waiting for my grandma to cut the cake!!!
Well, I'm off to bed!! Got to wake up early tomorrow!!
Wednesday, April 9, 2008
Authentic Mexican
After school yesterday I came home and wanted to make a quick dinner. I didn't have a lot of ingredients (since I barely went to the farmers market today) so I decided to make something classic... enchiladas.
But these weren’t' just any enchiladas, they were my Tofu-Veggie-Enchiladas. The dish was accompanied by a simple salad of iceberg lettuce and Mexican table cream. Dinner was ready in less than an hour, and the whole family loved them, even mom, and the hardest critic of "Americanized Mexican food". It is indeed going in my list of favorites!
Tofu-Veggie-Enchiladas:
4 Burrito-style flour tortillas
1/2 head of cauliflower
1/2 bunch of rapini* (cut into thirds)
1/2 onion (chopped)
1 package of firm tofu
2 cans crushed tomatoes
4 tablespoons spicy enchilada sauce, hot sauce, or homemade Mexican salsa
1 1/2 to 2 cups Monterey jack cheese (grated)
For the salad:
1/2 head of lettuce
1/2 cup of Media Crema**
On a hot wok spray non-stick spray
Put onions, cauliflower and rapini, sauté for about 1/2 hour or until vegetables are tender. Season with salt, parsley flakes, and pepper. Cut tofu into 1/2 inch cubes and throw in with vegetable mixture.
On a blender or food processor mix, crushed tomatoes, salt & pepper, 1/2 cup water and salsa. Blend until a smooth sauce is formed, set aside.
On a hot griddle spray non-stick spray and lay the tortilla a few seconds on each side, until it browns a bit. Repeat procedure for all four tortillas, making sure to re-spray each time.
Meanwhile get an oven-safe mold, butter and put some of the sauce mixture on the bottom. Fill each tortilla with the vegetable mixture, fold burrito style and lay with the opening down on the mold. Do the same for the remaining three, make sure to fill them up and use all the vegetable mixture.
Pour the rest of the sauce on top, and top with grated cheese. Place in the oven at 350F and bake for 30 -40 minutes or until cheese is melted and looks bubbly and crusty. (Everyone knows how enchiladas look!!)
Meanwhile wash the lettuce, and add Media Crema.
When the enchiladas are done, take them out, cut them in half, and serve with the salad and some more hot sauce. Everyone will love them!!
*Broccoli Rabe (pronounced Broccoli Rob) is also referred to as rabe or rapini. This is another leafy green vegetable that is frequently eaten in Southern Italy and has become popular in the United States. The vegetable has a slightly bitter taste and is frequently steamed or lightly sautéed in olive oil.
** Media Crema is a thick cream made by Nestle and widely popular in Mexico. Commonly you can find it at any Latino Market; however, if you can't find it or don't live near one, MexGrocer.com is a great place to get it, and other Mexican products!!
Sunday, April 6, 2008
Catching up on dessert
So, I guess when you start a blog it's hard at first to remember to... blog!! Well, after 10 days I'm finally back to blogging! And this time I have some wonderful desserts that I made the past week. I am a dessert/cake/ pastry lover, if I could eat anything in the world all day, everyday it would be desserts.
As a result I end up trying different kinds and discovering new tastes. The first one I have is a rhubarb pie, that I baked after reading about rhubarb in Saveur Magazine.
It was the first time I tried rhubarb, and I loved it, sweet yet a bit tangy. My mom said it has a similar taste to a strawberry. I don't agree all that much, each fruit has it's thing! The cake itself is pretty simple to make, with a rum sause ( I used Tequila).
For cake
1 lb fresh rhubarb cut into 1/2-inch pieces
1 cup sugar
2 1/2 cups cake flour (sifted)
3/4 teaspoon baking powder
1 stick cold unsalted butter, cut into 1/2 inch cubes
1/3 cup whole milk
2 large eggs (1 separated)
For sauce
1 cup cream
2 tablespoons confectioners sugar
1 tablespoon tequila
1/2 teaspoon vanilla
Make cake
Put oven rack in middle position and preheat oven to 400F. Butter a 10-inch pie plate and chill
Toss rhubarb with sugar in a bowl until coated
Whisk together flour, baking powder and 1/2 cup sugar in a large bowl until combined well
Blend in butter with pastry blender or fingertips until mixture resembles coarse meal. Whisk together milk, whole egg and yolk. Make a well in center of flour mixture and add milk mixture, stirring with a wooden spoon to gradually incorporate flour and form a soft sticky dough.
Transfer half of dough to chilled plate and pat over bottom and halfway up side with well-floured hands, then spoon rhubarb and any juices onto dough.
Using tablespoon, spoon remaining dough in small mounds evenly over top. Lightly beat egg white with a few drops water, then lightly crush cake with egg wash.
Bake cake until top crust is golden and rhubarb is tender... 30-40 minutes.
Make tequila cream
Beat cream with confectioners sugar, tequila, and vanilla in a bowl with an electric mixer until it forms stiff peaks.
serve cake warm with tequila sauce
The next recipe came to me on a trip to my local ranch market. I was cruising the food isles and out came popping on a cart full of pumpkins, butter nut squash, red corn, and small fall leaves. All its contents was on sale,( due to the fact we are in spring not fall), how could I resist? I took a couple squash home and them began to ponder what to do with them. Pumpkin pie? No. Soup? No. Bread loafs? Maybee. Gelatin desserts, yes!!! It was soft, and lighter. Everyone in my family loved them, and my dad couldn't even tell it was made with squash.
First you need to boil two small butternut or acorn squash. The method I used is to put them whole, unpeeled into my slow cooker, add about 1/4 cup water and put on low for about 3-4 hours. It's ready when you stick a fork without any effort.
Take it out, cut in half and scoop. You can then add some cinnamon, sugar, and allspice.
To make gelatins
2 cups soy milk
2 cups squash puree
1/4 cup sugar
2 envelopes grenetin (7grams each)(br)
Instructions (br)
Mix sugar with grenetin, add soy milk and let stand for 5 minutes
Heat, remove before it boils. Add the puree en put in individual molds.
Refrigerate until it firms.
Decorate with dried fruit, and condensed milk.
Subscribe to:
Posts (Atom)