Saturday, June 28, 2008

Favorite June Things

So, the end of the month is nearing!! And I though I’d just post some of the things I’m crazy about this month!!
1. I am completely fond of going to
Fresh & Easy!
a British store giant that is setting up shop in Southern California and Nevada. The stores are small and they offer organic, local produce.
2. I also love these cute little chocolate cakes I found one day at the market!! They come from France, and are for babies, containing only 110 calories per serving!! Lulu Bears (from
LU!
here I come!!
3.Home made ricotta cheese and home made yogurt are in my top ten lists!! Sure they are more time consuming, and you should definitely eat them faster, yet they are delicious 100 times over their counter parts that come bottled up in the store. Next post is on how to make them!!
4.Basil!! Basil!!! Basil!! I recently discovered the beauty of basil and its versatility. Oh, my God!! I use it all the time!! And it smells so, so good!!
5. America’s Test kitchen and Food! Networks
Good Eats
are my favorite food programs.
I recently became a fan of Test kitchen, then I bought the last season on DVD, I’m thrilled and Good East is very down to earth funny show and it really has good stuff.

So, There my top five favorite things!!!

Happy June!!

Wednesday, June 25, 2008

Solvang, Part II


I loved this trip so much that it needed two parts to do it justice. As I mentioned on my previous post Solvang is a small Danish community nestled in the wine county of Santa Barbara, California. The surrounding areas themselves are mostly vineyards, agriculture tourism farms (ostrich farm, alpacas, apple groves, and some organic vegetable stands.
The center of the town is as picturesque as .50 cent postcard. It begins with a welcome sign and a big windmill. Antique collectors better have lots of money, or lots of self control because antique stores abound here. It is also home to many pastry stores and coffee shops, but the kind one finds in other parts, no Coffee Bean and Tea Leaf here, not Borders and Starbuks would be a crime! No, they are all private and very cute, some inside gardens, other inside tasting rooms and some inside book stores. There are some used book stores that sell everything from Microwave cooking to collections of the Little Mermaid.
And while we are on that subject Hans Christen Anderson author of the Little Mermaid and Thumbelina was Danish. So it’s only logical that there be a statue of his face in the park and a small museum dedicated to his art, his novels and his loves. Did you know he had 3 girl friends? The first a sister of a friend utterly loved him, he gave her the no. The second a rich society girl gave him the no, and finally after he became famous another beautiful singer fell in love with him, but the age difference made her put and end to it. Sad and tragic tale!! LOL

Another big attraction in Solvang is the Santa Inez Mission, is one of the many mission dotted along the map of California. This is on the small side, compared to the Santa Barbara and San Juan Capistrano, yet it is not less beautiful the entrance is through the gift shop, there I bough a pencil and a card, and admission is only $ 4 per person. You get a brochure and a blessing. It showcases various religious artifacts, and you can visit the gardens and the cemetery.
Other random things are the motorcycle museum, and the rooster that walk around the street.
A hop and ride (on the Santa Inez Transit Bus) you can get to los Olivos another vineyard city. It is even more rural than Solvang and to me more charming!! Its downtown is only 2 streets long!! Enjoy the walk, there you can see the library, the arts museum (that exhibits local artist and painter and the many noveau art galleries, don’t forget to taste that wine!!
I left my heart in Solvang!! I wish I could say it in Danish!!
Go There!
Solvang

City of Solvang


visitors


Mission Santa Inez


Los Olivos


Hans Christen Anderson Museum


Ostric Farms


alpacas!!

Saturday, June 21, 2008

Little Denmark, in California!!

So, let me tell you about my beautiful trip to the central California coast. For those not familiar it’s above Los Angeles, in Santa Barbara County (Sideways filmed here).It started out Monday noon, taking the Amtrak train from Fullerton to Santa Barbara, then a connection bus to Solvang.
Solvang is a Danish community founded almost 100 years ago. It is also in Wine County and those two things make it very attractive to tourism. This post is just about the food, I’m still working on the rest of the photos. I took like 100. But, don’t worry I wont post all of them!!
After our arrival on Monday, we realized the town goes to sleep early. No great eats!! But, Tuesday that’s another story. The day started out in the Olsen’s Danish Pastry Shop.
Complementary breakfast from our hotel included Danish pastries and coffee. The cinnamon roll is great, the cheese Danish my mom had seemed out of this world!!
The server in their cute Danish uniform, were very friendly!!
After that we went about the streets, took the local bus to Los Olivos, and then came back for lunch at the Paula’s Pancake House.
The potato and leek soup tasted very light, not processed or salty. The vegetarian sandwich I ordered included alfalfa, avocado, tomato, onion, cheese on rye bread. I loved it.
The only bad part? I arrived at 3:00 they close at 4:00.
With so much free time on our hands we did olive tasting, wine tasting, and chocolate tasting. Okay, that was more like stuffing ourselves with chocolate!! They had a local chocolatier, and then a fudge factory (pictured). So much good stuff!
Then after resting at the hotel we went to dinner. The Bit of Denmark seemed a good choice, offering local fare. They had a smorgasbord buffet for $16 dollars a person. I had carrot salad, green salad, olives, prickled cauliflower, and pasta salad and pumpernickel bread.
The second serving consisted of veggie broth (a little salty), mashed potatoes, German style cabbage, and havarti cheese with poppy seed bread. !!
For dessert you could choose Danish pasties, pears, gelatin, pudding or fruit salad. I couldn’t eat one more bite
I did have a glass of Firestone Riesling a local brand of wine that I loved. I even bough a bottle for home.
After that if was a sweet dream for me!!

Wednesday, June 18, 2008

Three Things To Do with Mexican Chocolate

Okay I’m back from a wonderful trip to Solvang, California. Unforgettable!! But I’ll post on that later, once I edit my pictures… Today I’ll post about a couple of things I did before leaving… all three with Mexican Chocolate.
It has a certain spice to it, which gives it …that… Mexican taste!!

The first were these delicious Shortbread Cookies. The recipe itself came from The Cookie and Biscuit Bible” (Hermes House Press). The decorations however came from me, using a mix of Mexican chocolate and butter, and piped to made designs.

Mexican chocolate cookies!!

Ingredients:
8 oz butter softened
4 oz confectioner’s sugar
1tbsp vanilla extract
11 oz all purpose flour
Salt
5 oz pecans (finely chopped)

3oz Mexican chocolate
4-6 oz butter

Procedure:
1. Preheat oven to 375F. Beat butter until fluffy; add 4oz sugar and vanilla.
2. Gradually add the flour and salt to mixture beating after each addition. Until dough is formed.
3. Add chopped pecans and knead until combined.
4. Roll dough out to about 1/3 inch and cut with cookie cutters of your choice
5. Bake for 10-15 minutes and let cool for 10 minutes, then using spatula transfer to finish cooling.
6. Melt chocolate and butter in microwave; pour into piping bag and decorate!

Second thing I made is this cute lava cakes. They are fun to make!!

Mexican Chocolate Cakes

Ingredients:
16 oz heavy cream
11 oz Mexican chocolate (chopped)
3 tsp cinnamon
3 eggs
3 egg yolks
4 oz sugar
4 oz cake flour, sifted
¼ once Mexican chocolate grated
4 oz confectioner’s sugar
2 tbsp vanilla extract

Procedure:

1. In a heavy bottomed stainless steel saucepan bring 12 oz cream to boil over medium heat. Stir in 6 oz Mexican chocolate and 1 tsp cinnamon and blend well until melted. Chill the mixture until firm.
2. Preheat oven to 375F. Butter 12 (4 oz) ramekins, completely coating the sides. In a heavy bottomed saucepan, melt the butter and 5 oz chocolate and stir until melted. Set aside. Whip the eggs, egg yolks and sugar with a mixer until they are a light lemon color and tripled in volume. With a rubber spatula, carefully fold in flour and chocolate-butter mixture. Whip with mixer on medium speed until glossy. With a spatula, fold in the grated chocolate and vanilla extract.
3. Transfer the cake batter to a pastry bag with no tip. Using the pastry bag fill the ramekins ¾ full. With a small spoon, place a small portion of the prepared ganache into the center of each filled ramekin. Bake the cakes for approximately 8 – 10 minute. The cakes should be firm around the edges and pull away from the sides. The finished cakes are firm on the outside but soft on the inside.
4. Whip the heavy cream until firm; add confectioner’s sugar and vanilla extract. Serve cakes immediately.

And finally a non- baked treat. Gooey chocolate “truffles” Yes, I watched Food Network the other day and saw Good Eats, they made truffles.

So, I decided to try some, the chocolate didn’t set really… (Trying to figure out why?), But, I proceeded in coating the result and made tasty delicious treats!!

Mexican “Truffles”

Ingredients:

6 oz heavy cream
3 oz Mexican chocolate (chopped)
4 oz dark chocolate
4 oz butter

Coating of your choice (I used chopped almonds, shredded dried mango, and cocoa and espresso powder.)

Procedure:

1. Bring heavy cream to a boil, add Mexican chocolate. Let cool.
2. Melt chocolate and butter in a separate bowl. Mix with Mexican chocolate spread on a tray lined with parchment paper and let firm in the refrigerator.
3. About 1 hour later, scoop chocolate mixture, form into “balls” (It wont firm really well so don’t worry if they don’t come out perfect)
4. Let cool again for about 30 minutes, then scoop again, and put in desired coating. Enjoy!

I hope you try them all, or at lest one. And if you simply need hot chocolate, grab a gallon of 2% milk, heat and add one tablet of Mexican chocolate. Heat till dissolved. Fiesta time!

Saturday, June 14, 2008

home made pasta, pesto and trip to fresh and easy

Today has been very eventfull, in the morning I headed to sing up for decorating classes and my local Michaels (arts and crafts store). Then I returned on my bicycle and got my car to the local auto parts store, then my mom and me headed to fresh and easy to grocery shop!!
http://www.freshandeasy.com/
my favorite part of the day!!!

Arriving at around 4 pm, I set out to do the cooking. I had a lot of basil in the fridge, but didn’t feel the traditional pesto…

So I came up with a funky Three-Cheese-Basil Pasta


Ingredients:

20- 40 basil leaves…finely chopped
4 oz butter
½ cup creamy blue cheese
½ cup shredded parmesan
1 cup feta cheese

Procedure:

Heat a non-stick skillet, melt the butter gradually the three cheese, stirring constantly.
As they become a gooey mass, add the basil and stir. Pour immediately over hot pasta, toss and server.

In this occasion I used home made wheat pasta, but any pasta (fresh or dried) can be used!!

Everyone loved it. Great father’s day recipe!!!

Tuesday, June 10, 2008

mushroom pudding and red pepper sauce!!

The other day I found myself with leftover bread (stored in the freezer) and two lonely Portobello mushrooms hiding in the veggie cabinet.
Pair that with a die-hard bread pudding fan and you got Portobello Mushroom Pudding!!

It is very simple to make, and the Portobello mushroom could be substituted for regular button mushroom. Plus it looks lovely decorated and can b saved for the following day!!

Ingredients:
For pudding
75 grams unsalted butter (melted)
6 eggs
8-12 oz red wine
3/4 cup of milk
90 grams day-old bread
1-2 Portobello mushrooms (diced)
Pepper and salt to taste
For Sauce:
2 yellow bell peppers
2 red bell peppers
½ onions diced
1 oz red wine
Salt and pepper to taste

Procedure:
Mix the wine and milk together
Pour over bread and let soak for 30 minutes
Then mix the remaining ingredients together
Pre-heat oven at 300F
Pour in a buttered oven mold
Bake in water bath for about 40 minutes or until set.
Meanwhile dice onions, sear them until golden,
Deglaze the pan using the wine. Put the liquid in a blended, add onions, bell peppers and add a little H2O if necessary.

Puree until smooth, them bring to a boil and let simmer for 10 minutes.
Once the pudding is out, let it cool completely!! The using cookie cutters form into shapes, plate and serve the sauce over it. Voila!

Tuesday, June 3, 2008

Cheesecakes Galore

I love cakes, angel cakes, chocolate cakes, tipsy cakes and cupcakes, yet, cheesecakes hold a certain magic a marriage of sweet and salty, a love story on its own.
In the last week I have been experimenting with some different versions of cheesecakes. There is of course my mother’s recipe, the one that invokes childhood memories, helping mom in the kitchen after school, then eating the pie while still soft and gooey, I had problems waiting for it to firm. =) But, that seemed too easy, I needed to try something a bit more innovative, at least for me!

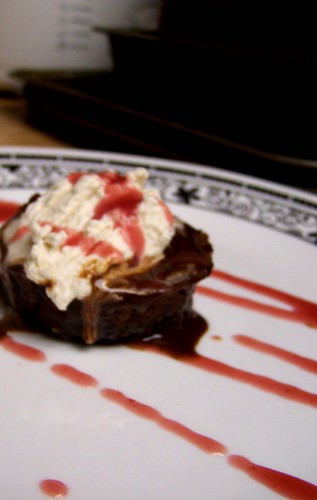
The first I tried is a strawberry swirl cheesecake, decorate it with berries on top and you have a cake worthy of any occasion.
Swirl Cake (Picture 1)

1 1/4 cups graham cracker crumbs
1/4 cup sugar
1/3 cup butter or margarine, melted
2 (10 ounce) packages frozen sweetened strawberries, thawed
1 tablespoon cornstarch
3 (8 ounce) packages cream cheese, softened
1 (14 ounce) can sweetened condensed milk
1/4 cup lemon juice
3 eggs
1 tablespoon water
Procedure:

1. Combine graham cracker crumbs, sugar and butter. Press onto the bottom of an ungreased 9-in. spring form pan. Refrigerate for 30 minutes.
2. In a blender or food processor, combine strawberries and cornstarch; cover and process until smooth. Pour into a saucepan; bring to a boil. Boil and stir for 2 minutes. Set aside 1/3 cup strawberry sauce; cool. Cover and refrigerate remaining sauce for serving.
3. In a mixing bowl, beat cream cheese until light and fluffy. Gradually beat in milk. Add lemon juice; mix well. Add eggs; beat on low just until combined. Pour half of the cream cheese mixture over crust. Drop half of the reserved strawberry mixture by 1/2 teaspoonfuls onto cream cheese layer. Carefully spoon remaining cream cheese mixture over sauce. Drop remaining strawberry sauce by 1/2 teaspoonfuls on top. With a knife, cut through top layer only to swirl strawberry sauce.
4. Bake at 300 degrees F for 45-50 minutes or until center is almost set. Cool on a wire rack for 10 minutes. Carefully run a knife around edge of pan to loosen; cool 1 hour longer. Refrigerate overnight. Remove side of pan.
The other cake I found on the LA Times Food Section (truly the only reason, I buy the paper!)


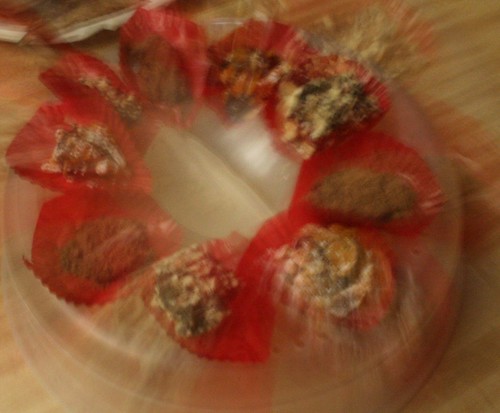
Recipe: Tall and creamy cheesecake (Picture 2)
(I substituted some ingredients from my own pantry!!)
Butter for greasing the pan
1 3/4 cups graham cracker crumbs
1/2 cup finely chopped walnuts (substituted chocolate chips)
1 1/3 cups sugar plus 3 tablespoons, divided
Salt
4 tablespoons (1/2 stick) butter, melted
1 pounds cream cheese, at room temperature
1 teaspoons vanilla extract
4 eggs, at room temperature
1 1/3 cups mascarpone cheese, at room temperature (sour cream)
2 cups blackberries (dried cranberries)
Procedure:
1. Make the crust: Butter a 9-inch springform pan with sides at least 2 3/4 -inches high, and wrap the outside of the pan in a double layer of aluminum foil.
2. In a medium bowl, combine the graham cracker crumbs, walnuts, 3 tablespoons sugar and a pinch of salt. Pour in the melted butter and stir together, using your fingers or a fork, until all of the dry ingredients are uniformly moist. Place the crust mixture into the springform pan and use your fingers to pat an even layer (about one-fourth-inch thick) of crumbs over the bottom of the pan and about halfway up the sides. Place the pan in the freezer while you heat the oven.
3. Center a rack in the oven and heat the oven to 350 degrees. Place the prepared springform pan on a baking sheet and bake for 10 minutes. Set the crust aside to cool on a rack while you prepare the filling. Reduce the oven temperature to 325 degrees.
4. Using a stand mixer or in a large bowl using a hand mixer, beat the cream cheese at medium speed until soft and creamy, about 4 minutes. With the mixer running, add the remaining sugar and one-half teaspoon salt and continue to beat until the cream cheese is light and fluffy, about 4 minutes. Run a spatula along the sides and bottom of the bowl to make sure everything is combined. Beat in the vanilla, then add the eggs one at a time, beating a full minute between each addition -- you want a well-aerated batter. Reduce the mixer to low and beat in the mascarpone. Run a spatula through the batter again to make sure everything is evenly incorporated.
5. Place the foil-lined springform pan in a roasting pan. Pour half of the batter into the springform pan. Gently drop the blackberries over the batter, then spoon the remaining batter over the berries and smooth out the top. Make sure that the batter comes no higher than the top of the pan; you might have just a little batter left over.
6. Place the roasting pan in the oven and pour enough boiling water to come halfway up the sides of the springform pan.
7. Bake the cheesecake for 1 1/2 hours, until the top is browned (and perhaps cracked). Turn off the oven and prop the door open with a wooden spoon. Allow the cheesecake to sit in the water bath for an additional hour.
8. Remove the roasting pan from the oven, and remove the springform pan from its water bath. Carefully remove the foil from the springform pan, and cool the cheesecake to room temperature on a rack. Cover the top of the cooled cake lightly with plastic wrap and refrigerate at least 4 hours, preferably overnight.
9. To remove the sides of the springform pan: Run a blunt knife around the sides of the pan, and then warm the sides of the pan lightly with a hair dryer before unmolding. To slice, run a long, thin knife under hot water then lightly wipe dry.

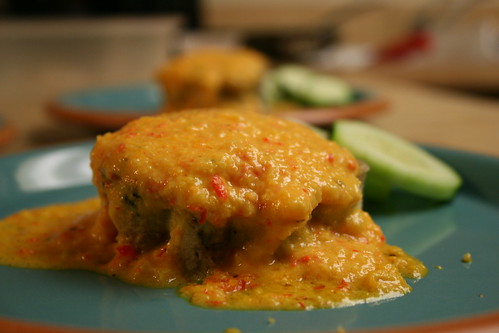
The final cake (Picture 3) I did was just a simple variation of the later. I simply substituted the sour cream for half ricotta and half mascarpone cheese. Delicious