Monday, December 22, 2008

WINE, CHEESE AND BREAD

There are many things I love in life, too many to put up in a post, it would take days to read. It would sound like a speech, "Hi, my name is Aracely and I like dark chocolate truffles, sour apple Martinis I enjoy rainy days and long walks on the beach, etc.
But there are only a couple of things in the culinary world that I absolutely adore and could never ever give up. they are bread, cheese and wine. Yes, epitome of the Old World.

So, I decided to dedicate this post to those three things in areas that are related to my life right now.

The first is the beautiful dinner rolls I baked as my baking final. They were in two designs the traditional round, and the knott. They are decorated with egg wash and poppy seeds.
I loved how they tasted warm and out of the oven, buttery yeasty smell. OH, they were good.


The second is wine. I love wine, I love to go wine sampling, my job involves a big wine culture and I recently started reading the biography of the Robert Mondavi Family.

The HOuse of MOndavi is an epic tale of family feud, wine history, friendships lost and gained, love, hate and lots of crushed grapes. It is everything you would expect from America's most famous wine dynasty.


And finally for cheese I wanted to praise the coming of of fondue. Yep, its everywhere this holiday season. There is fondue pots, fondue books, recipe's and lots of cheese.

Saturday, December 6, 2008

One more final down!!


Yup you guessed one more final checked off, this one is for international cooking. Here me and my partner made italian themed menu. We made a spinach brushetta, a baby spinach salad, fettucine alfredo with zucchini and also pear in red wine.. the best part of the meal!!

Thursday, December 4, 2008

finals!! Yeah!!

Yeah, the semester is coming to a draw. Yup that's why I'm actually blogging again. Not that I havent been blogging at myspace and facebook, they are kind of compulsive behaviour. But, since my mother also took my DSRL and my Digi Kodak away I had to wait till black Friday to go buy a new camera....
So finally here it is my first december post... I'm guessing that now with the holidays more will come... Yup Yup

So this is my final for my Quantity Class... The entree was a chicken marsala with linguine and cauliflowers....

Very italian!! Gracie!!

Thursday, November 13, 2008

Favorite October Things

I know, I know it has been way longer than usual since I have posted. And i am going to use the same excuses that I always do but they are true.. I have soooooo much homework and work that I rarely have time to bake or cook. And also my mom took my beautiful cameras away so I can't take pictures... Not until she gives them back or I buy a new one and with car payments thats hard.

Anyway I thought meanwhile I can do, Favorite October Things...

1. Favorite, favorite thing Halloween Parties and Dressing Up!!

2. Pumpkin spice latte at Starbucks

3. Chrysler's 300S, Toyota Yaris

4. My new Mac Book and all the nifty and cool things I can do with it.

5. chianti stracalli wine!!

Wednesday, October 29, 2008

Vienna in the HOuse!!

So last week I had to do my mid-term report for baking and pastry class. The whole thing was that we were supposed to do an international report on a given country that we picked out of a hat. WOW, I got Austria! Austria? Yeah, Austria and so my research began!!
It was pretty easy to find some history on Austria the hard part was to find food information on Austria because it's such a small place and most of the dessert information was about Apple Streudels!!! Which are so "pasee".
And then there it was a cool historic dessert that belonged only to Austria the SacherTorte.

And here is the recipe!!

Ingredients
200g Excellent Quality Dark Chocolate
1 1/2 Teaspoons Ground Coffee (freshly ground if possible)
6 Eggs (5 separated)
150g Ground Almonds
310g Granulated Sugar
6 Tablespoons Apricot Jam
Icing:
100g Excellent Quality Dark Chocolate
40g Unsalted Butter

Directions
1.Preheat oven to 180c.
Butter and line a 9" Springform Tin.
2.Gently melt the 200g chocolate in a double boiler.
In a large bowl, whisk the 5 egg yolks and remaining whole egg with the sugar until pale and fluffy
In a separate bowl, whisk the egg whites until stiffly peaking.
3. Add molten chocolate to the egg yolk mix and combine well.
4. Gently but firmly fold in the whipped egg whites until throughly combined.
5. Pour into the cake tin and bake for about an hour (it may be done sooner). Halfway through cooking or when the top has set, cover with some foil. This cake burns easily because of the egg whites.
5. When cooked, remove from the oven (the top may crack or sink, again due to the high egg content). Don't worry because you can always do as I did - turn it upside down!
Leave to cool on a rack.
6. Once cool you can begin the icing. Melt the Apricot Jam in a small saucepan over a gentle heat.
7. Unmould the cake, and decide which side up you are going to ice it. Brush over the now liquid Apricot Jam thickly over the top and sides. This is not merely going to help the icing stick but will be an important and surprising layer of the cake.
In a double boiler, melt the 100g chocolate. Once liquified, add the butter and stir until melted. It might look as if it's going to seize up but keep stirring over the gently heat and it will become runny, like double cream.
Pour over the cake, spreading fairly quickly over the top and sides until it is coated all over. With the back of a spoon, make a circular pattern. You can pipe the familiar Sacher moniker on the cake with a little melted chocolate if required.

Wednesday, October 15, 2008

LEMON CURD CAKE


I feel like I have abandoned my precios blog... I haven't. I just have piled up pictures of cakes and food's I've made and take a picture to post them, yet the hours of the day fly away like butterflies if you come near.
And so comes the end of a day, the end of the week, the end of the month. The good news is, it's not yet the end of the month, and second good new is I have like 50 minutes before I leave for work which means I have some catching up to do.
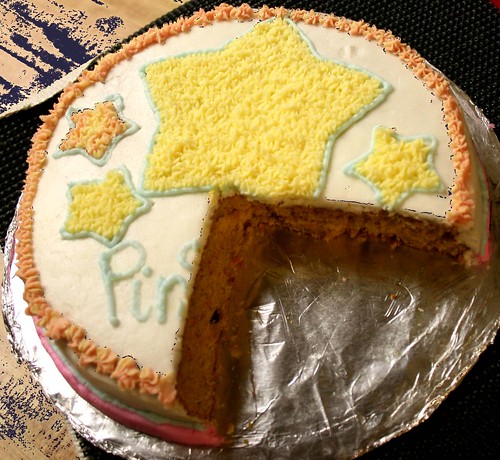
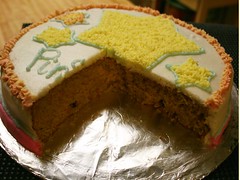
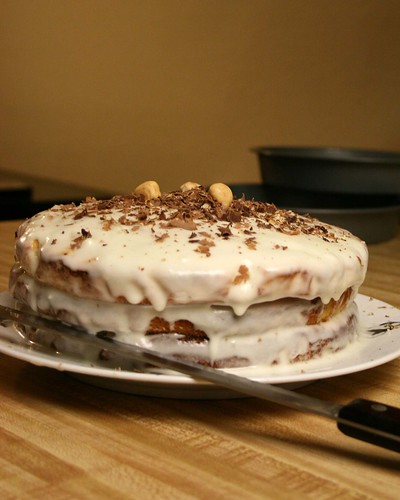
So, last week I had a half day off, and though I had some homework piling up with my cake pictures I decided to grab my apron and do a cake. Me and my mom had already bought all the ingrdients for a lemon curd cake from...yes... the Martha book. I think I have decided I am going to try and do all the cakes in the cake chapter. Just the cakes!!
Well ,the cake was a bit labor intensive, though nothing compared to the Austrain Sacher Torte I made for school, which I will write on later!
Here are the instructions for the lovely Lemon Curd Cake

Ingredients:
1 cup unsalted butter, room temperature
1.5 cups all-pourpose flour
1.5 cups cake flour
1tbs baking powder
.5tsp salt
1 cups sour cream
Grated zest of two lemons
2tbs lemon juice
2 cups sugar
4 large eggs
2 batches lemon curd
1 batch Lemons Swiss Meringue Buttercream

Directions:
Preheat oven to 350, Butter 2 9x2 round cake pans, line with parchment paper, butter parchment paper.
In a bowl sift together, flours, baking powder, sant, set aside.
In a separate bowl combine sour cream and lemon juice/zest
In an electeic mixer combine butter adn sugar for about 5 minutes, scrape, add eggs one at time and beat for 1 minute after each.
Then on low speed ad four mixture alternating with cream. Start and end with flour.
Divide batter into pans, bake for about 30 -35 minutes until tester comes out clean. Let cool on pans, then transfer to cooling racks top sides up.
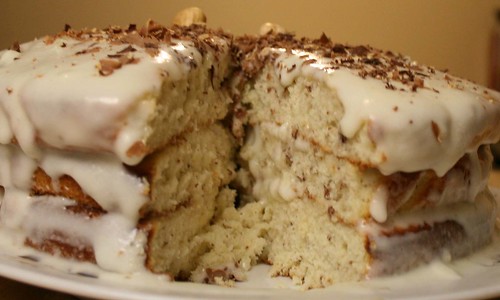
Using serrated knife, trip tops to even cakes, slice each layer in half, making two layers. Place one on bottom of cake plate, and spread 1/2 cup Lemon Curd over top. Repeat process with remaining layers, do not put curd on top layer.
Crumb coat with meringue and let chill for about 30 minutes.
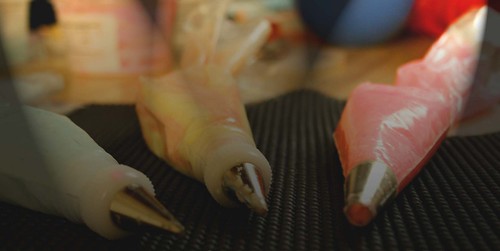
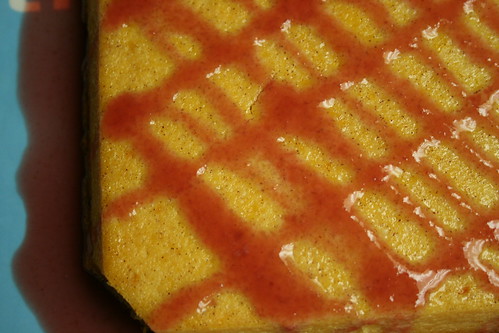
Using offset spatula spreat entire cake with buttercream. Refrigerate 30 minutes before decorating with lemon curd. Using paper cornet filled with curd, pipe dots to decorate cake. Then pipe vertical lines of differet sizes on sides of cake. It can last refrigerated for up to 3 days.
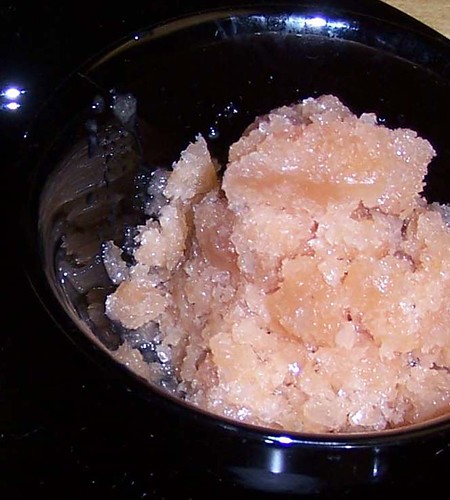
LEMON CURD
Ingredients:
8 yolks
zest of 2 lemons
1/2 cup fresh lemons juice
1 cups sugar
6 oz unsalted butter,, cut into pieces.

Directions:
Combine yolks, lemon zest, juice, and sugar in heavy bottomed pan, whisk. Cook over medium heat, stirring constabtly with spoon until thick enought to coate a spoon.
Remove from heat. Add salt and butter, one piece at a time, stirring until smoooth. Strain, cover with plastic wrap, refrigerate at least one hour.

LEMON SWISS BUTTER CREAM
Ingredients:
4 egg whites
1.25 cups sugar
1.5 cups butter room temperature
3/4 cup lemon curd

Directions:
In the heatproof bowl of an electric an electric mixer set over saucepan of simmering water, combine egg whites and sugar. Cook whisking constantly, until sugar dissolves.
Attach bowl to mixer, fitter with whisk. Beat eggs on high unti stiff peaks form, Continue beating until fluffly and cool.

Change to paddle, add butter pieces at time, beat well after each addition. With spatula mix in 3/4 cups lemon curd.

Saturday, October 4, 2008

The Homemade Cake


Straightforward and simple, that’s what life should be. And since food is part of that flowing existence we tend to call life, I will present a beautiful recipe. No big story on how I got it, or who made it famous, just good food and a glass of wine!!

Ricotta Cheesecake

Ingredients:
4 cups homemade ricotta cheese (or store bought)
1 cup granulated sugar
1 tsp vanilla extract
1 tsp orange juice
Salt
4 large eggs
Cooking spray
2 cups chopped walnuts, almonds, hazelnuts

Procedure:
Preheat oven to 350F
To prepare cake, place first 5 ingredients in a bowl and beat for 2 minutes on medium.
Add eggs 1 at a time, beating well after each addition. Pour batter in to 10 inch spring form pan coated with cooking spray. Bake at 350F for 1 hour or until cheesecake center barely moves when pan is touched. Remove cake from oven, run blade around edge of cake, remove ring and cover with chopped nuts.
Button crust is optional.
Mine was just ½ cup Ritz, ½ cup Marias , 1 egg, ½ cup butter, mix with hands. Pat on bottom of pan, blind bake for about 5 minutes.

Wednesday, October 1, 2008

Pineapple- mango Joy


Okay, so I fell for it. I bought a Martha Stewart Cookbook what will the chef gods say? I was walking around Michaels the other day (something dangerous for me) with a 40% off coupon and suddenly I saw the book isle. Yes, it was tiny and there were only maybe a dozen cookbooks. All seemed too related to the food network somehow and so I strayed away!! However, nestled neatly to the right was Mrs. Stewart with the Baking Cookbook and it kind of called to me?
You can guess what happed next, I bought it yes I bought it and it only cost me $22 dollars I still had left over to buy some chocolate truffles. When I got home I stuffed it in my growing book collection and forgot about it for almost a week.
Then only of those miracle nights when I have some time I took it out. To be honest I was kind of wary to follow the exact instruction, but decided to go for it, after all I had bought it for a reason, right?
I made the very simple Pineapple – Mango Turnover.

1 ¼ sticks of butter, room temperature
1 medium ripe pineapple, peeled and cut into slices
1 medium ripe mango, peeled
½ cup packed light brown sugar
1 ½ cup all purpose flour
½ tsp salt
¼ tsp baking soda
¼ tsp baking powder
1 cup granulated sugar
2 large eggs
1 tsp vanilla
¼ sour cream

Procedures:

1. Preheat the oven to 350F. Butter an 8 x 2 inch cake pan, line it with parchment paper, and butter parchment. Using a 3 inch cookie cutter, cut out rounds from center of four of the pineapple slices. Chop enough of the remaining pieces to yield 1 cup. Place chopped fruit in a fine sieve set over a bowl to drain.
2. Cut the mango lengthwise into ¼ inch thick slices. Using the 1 ½ inch cookie cutter, cut out four rounds from the mango slices, set aside. Finely chop enough of the remaining mango to yield ½ cup, add the pineapple sieve.
3. In the bowl of an electric mixer fitted with the paddle attachment, beat 2 tbsp butter with the brown sugar until light and fluffy, 2 – 3 minutes. Using a small offset spatula evenly spread butter mixture in the bottom of the prepared pan. Place a reserved mango round in the center of each ring.
4. Sift together flour, salt, bp and bs, set aside. Place a reserved pineapple ring in each corner or the pan. Place a mango center. In the bowl beat remaining butter with sugar on medium until light and fluffy 2 – 3 minutes. Add eggs, one at a time, beating well after each addition; scrape down the sides of the bowl as needed. Beat in vanilla, add flour mixture in two parts alternating with sour cream, beginning and ending with flour.
5. Transfer chopped pineapple- mango mixture to cake pan; discard juice. Using a small spatula spread fruit in an even layer on top of cut out fruit. Then spread batter evenly over fruit.
6. Bake, rotating halfway until cake is golden brown and cake tester comes out clean about 40 – 50 minutes. Transfer to wire rack to cool, invert into plate, peel off the paper. Serve cake warm.

The cake was rich and moist, and I think one of the best I have made in a couple of times. All my family loved it!!

Blogging Survey!!

so i was visiting another blog and I love to fill out surveys... Thank YOu MySpace!!
So I thouhgt that while i wait for my laundry to be done I would fill out this lovely survey!!

What are the last three things you purchased:
1. A chocolate cake shake
2. A litttle coin bag from Target
3. Two black pants for work

What are the last three songs you downloaded:
Don't know the exact songs - but I know I recently downloaded songs from:
1. Disturbia
2. Sway by Michael BUbble
3. American BOy

What are the last three places you visited?
1. The Gym
2. the movie theater
3. my job on an off day

What are your three favorite movies?
i wish there was a list of 20
1. An Affair to Remember
2. On the edge
3. being julia

What are your three favorite possessions?
1. My rebelt xt digital camera
2. my car
3. me car

What are three things you can't live without?
1. my memories
2. my cell phone
3. myself in a happy mood

What would be your three wishes?
1. To be truly happy if even for an instant
2. To finish school and get going on my career
3. To live in Oregon

What are three things that you have not done yet?
1. gone to live in mexico for an extended perio of time
2. lived by myself
3. visited europe

What are your 3 favorite dishes?
1. pasta with any sauce
2. quesadillas
3. any type of sweet

What 3 celebrities would you want to hang out with most?
1. drew barrymore
2. meryl strip
3. ben affleck

If you could describe yourself in 3 words what would it be?
1. stubborn
2. sentimental / temperamental
3. Impatient

What are 3 things you are currently coveting?
1. A large kitchen
2. A mercedes benz/ bmw
3. A new ipod cellphone

Name 3 things you are unusually good at.
1. cooking
2. writting songs / short stories
3. my job

Monday, September 29, 2008

Favorite September things

I wanted to acknowledge the end of September by posting my favorite things for September. This has truly been a month of learning; I don’t just mean learning at school, that I do every month. I mean learning in the school of life, taking those hard hits that make us realize all the good things us already posses.
1. Leaning that the job you had is better than the new one you got, and having the courage to admit it and go back.
2. Starbuck’s new breakfast offering, the oatmeal and dried fruits is delicious! And, yes Pumpkin Spice Latte is back!! Hip-hip hurray!!
Starbucks Coffee!!

3. Learning to make pastry cream, and adding shredded coconut!! Coconut Pie is coming!!
4. Buying School Books, Opening the pages, seeing their glossy shine, the smell new textbooks have, of unused paper, running my hand over the cover and knowing that in a few months I will not used them again!!
5. Olive Garden’s wheat pasta!!

Life is so complicated in today’s world, the economy is a growing concern, it shadowed the Olympics, it is downplaying the election and all the other things we take for granted. Global warming, Wars, and political conflicts also play a part in the many things that worry us today.
Time is limited and time for bonding is scarce, and when we use that time with out iPods, and laptops instead of sharing with another human being. But, its those special little things, the smiles you get when you go out to eat and the server gives you a laugh, the little sprinkles of rain that mark the beginning of fall, your favorite song playing in the radio, seeing the sky turn fiery red when the sun goes down, learning that bad things are not always so bad.

Thursday, September 18, 2008

Cypress College Culinary

So, here I am late into the night doing my homework. And then in the midst everything I had a bright idea. Yes, one can have a bright idea at 10:43 PM, after having beeb awake since 6:00AM, going to school all day and eating apple pie half an hour ago.
I though I'd do a post on my school! Yes, a post on Cypress Culinary College. It's not a big name school, in fact it's a small community colle. But the facilites are very good, the curriculum is very well crafted and the teachers are the best. I feel like a small community of friends and family, when I go there. A lot of the students know eachother, they help eachother, they eat with eachother and once in a while they party together.. Hey, you gotta have some fun.
I love the classes, we are getting new menu for our small caffe, we are getting a new computer system, and the culinary classes give structure and freedom.
Like today, we had complete Moroccan Menu for our sit-down restaurant.
I could have gone to Oregon (where I wanted to go) and study at Bend Community College and their complete pastry program, or Le Cordon Blue and their "French Cuisine" or the highly respected CIA which I might one day go, after I have a few years in the industry under my belt. But for today, I'm content with my small community college, our 5 or 6 teachers, our huge kitchen, and our small caffe that is open 4 hours a day.
It's a home away from home!
And if you'd like to visit the website, here its is. I'll post some pics of me in my uniform soon!!


Cypress College Culinary

Saturday, September 13, 2008

Asian Inspired

I love Asian food, love it, love it, and love it. Any kind of Asian food, from Chinese take-out, to Japanese rolls, to Korean kim-chi.
However, I don’t really like the fat that comes associated with all that fried food!!
And so, as I stood inspired in my tiny 4 x 4 kitchen the other day, opened my fridge and saw sitting there lonely and forgotten on the bottom shelf, a bag of wheat germ sprouts.
I looked to the left and saw soy sauce, I looked to the right and saw Portebello mushrooms, (my mouth began to water) and then I saw some barbecue sauce. Needless to say we were having sprouts for dinner!!
The recipe is very simple, the presentation is easy to get but the result are awesome. And they can be used as snacks, appetizers, or with some salad do a main entrée.

Asian Influenced

Sprouts

Ingredients:
1 pound sprouts
2 Portobello mushrooms, (diced)
¼ cup soy sauce
2-3 tablespoons barbecue sauce
1tsp dried thyme
½ tsp cinnamon
Salt and pepper
3-4 flour tortillas
4tsp cottage cheese

Procedure:
1. Add some olive oil to a hot wok, then slowly add the sprouts, and mushrooms, and half the soy sauce.
2. Let them sizzle for about 3 minutes, stirring.
3. Then add the rest of soy sauce, barbecue sauce and the spices. Then let them sauté for about 5 minutes or until most of the liquid is gone, and they mushrooms look lightly browned.
4. Meanwhile, grab ¼ cup olive oil and some salt and garlic, set aside. With a large cookie cutter cut shapes from the flour tortillas. Brush with the olive oil mix and toast in the oven or convection over for about 2-3 minutes on each side.
5. Then with a fork put some sprouts on each tortilla and top with cottage cheese.

And now let me sound like a television cooking show. These are tasty and delicious and easy to make!!

Sunday, September 7, 2008

The Last Class Cake


I know, I suddenly stopped writing about the cake decoration classes I was taking at Wilton’s. Well, they were finished at the end of August, the second class! I was very fun and there was way less people than the first one, what an advantage! Every Thursday we leaned flower techniques using Royal Icing, and also Color Flow! We diligently did different types of flower and saved them in long plastic columns called (flower curlers).
The last day we leaned how to do basked weaved with buttercream icing and, to decorate using the sugar flowers we had made the previous weeks.
The end result (in my view) was a beautiful cake that was very hard to eat, because we didn’t want to break it! And though other things got in the way of me, the camera card, and the computer I had to put them up for all to see!!
Sadly school took first place and has to use Thursday night for a Menu class, so cake decorating class 3 will have to wait until December!

Monday, September 1, 2008

The All-American Meal

Yes, the All-American Meal equals a hearty burger and dessert. It totally invokes nostalgia; it has become so popular now a day's that the true enjoyment of it has been lost.

Here I have decided to post my Portobello cheeseburger and my plum-peach tart.
Being a vegetarian it is hard to find a place that offers decent veggie-burgers, most chain-restaurants offer the alternative to put a frozen patty on there, or simple bring you a bun with vegetables!! That is hardly vegetarian at all.

Now, here is for everyone’s enjoyment my own "Veggie" burger.


Ingredients:

1 loaf Challah Bread (cut into 6 pieces)
4 oz cup mayonnaise
2 oz cup soy sauce
2 tomatoes (sliced)
6 lettuce leafs
1 egg
2 Portobello mushrooms (chopped)
1 medium onion (chopped)
1 bell pepper (chopped)
6 slices Provolone Cheese

Procedure:

1. Heat a large non-stick skillet, add oil
2. Mix the mushrooms, onion bell pepper and eggs with a wooden spoon. Mix until the mixture is pasty, add salt and pepper to taste.
3. Drop patties into skillet, let them brown 1 minute, position slice of cheese on top, let it stand another minute, them turn and let it cook about 2 more minutes.
4. Meanwhile toast the Challa bread, and mix soy sauce and mayonnaise. Spread on toasted bread.
5. When patty's are done put one on each bread, add tomatoes and lettuce, top with remaining half of bread.

You can add a salad, French fries, or potato chips. They are very filling and healthy so you can save all the calories for my plum-peach tart!

Ingredients:

8 oz all-purpose flour
2 oz yellow cornmeal
3tbsp sugar
1/2 tsp baking powder
1/2 tsp salt
4 oz chilled butter (chopped into small pieces)
3tsp orange juice
1 tsp all-purpose flour

1 can Plums
2 cans peaches

Procedure:

1. Pre-heat oven to 400F
2. Combine 8oz flour, cornmeal, sugar, baking powder, and salt into a food processor; pulse 4 times or until blended. Add butter, and pulse until mixture resembles coarse meal. With processor on add orange juice through chute processing until blended.
3.Press mixture gently into a 4-inch circle on plastic wrap, cover. Chill 15 minutes. Slightly overlapping plastic wrap.
4. Roll dough, still covered into 11-inch circle. Remove top sheets of plastic wrap place on baking sheet. Sprinkle dough with 1 tsp flour.
5. Let plums dry on towel paper, repeat if necessary. Then cut into slices, and arrange alternating peach and plum.
6.Fold edges of dough into center pressing gently to seal. Bake at 400F for 25 minutes or until crust is brown.

The Daring Bakers


So, I really hope this counts, because I'm posting a day late.

For my first post and in the middle of the first week of school, and also a hectic week at work, I managed to make the famous eclairs...

Friday, August 22, 2008

The Closing Ceremony, The Final Project and getting there

So, it’s Friday and yes yesterday I attended my cake decorating class. I have done so faithfully for the past month and a half. Unfortunately no more cakes have been involved just a lot of frosting. Butter cream, royal, and color flow. That is the reason why I haven’t made any posts on regards to that. However next Thursday it’s the ‘final project’ for Course 2 and I though I’d post some pictures of the things I’ve done with the leftover frosting!!
The first are champagne petit fours, with melted candy and cocoa power, these got to the company picnic. Everyone loved them…


And these are decorated with leftover color flow and royal icing. They just layer around the house for … 1 second!!


Tuesday, August 19, 2008

School and some thoughts!

School season officially started this Monday. I have been stressing out over, classes, schedules, and job commitments and of course all the money costs related to school, especially culinary school. F Y I there is lab fees, tools, uniform, etc.
Did I also mention that I joined a gym, have been job hunting, and recently started going to a church group, try fitting that around friends, family and some free time… there is just not enough hours in a day!!
But, alas I have made some free time to post in my lovely blog and describe to you how my days are going so far... yesterday I had my internship class, super fun just introductions and some basic instructions. Today, Quantity took the spotlight… here they’ll teach us about food manufacturing and portioning. Tomorrow (I’m very exited) it’s Baking and Pastry, and Thursday, I’ll have International Food, here we prepare food for actual customers! And at night I have Menu/Layout.
So, you can all feel pity for me at my busy schedule I have three classes at another college that include Small Business, Marketing, and ServSafe Foods. 24 units in total…
And to celebrate all this, I need to share to home recipes that can’t be made in a commercial kitchen; because the crock-pot is not commercial.
Bon Appetit!

Cran-Apple Risotto

Ingredients
1/4 cup butter
3 little apples (diced)
½ dried cranberries
1 1/2 t cinnamon
1/8 t nutmeg
1/4 t kosher salt
1 1/2 cups Arborio rice
4 tbsp Splenda
4 cups rice milk

Procedure
Use a 4 qt round crock-pot
Set the crock to high and add the butter, let it melt
Add the rice to the butter, and stir it around to coat it.
Add the apples, and spices. Stir in the rice milk
Let it cook on high for 3-5 hours or on low for 6 or so.

Banana- Chocolate Pudding

Ingredients:
1 ¾ cup self rising flour
6tbsp butter
2 ripe bananas
6tbsp caster sugar
1 ¼ cups milk
1 egg (beaten)
2/3 cup chocolate chips

Procedure:
1. Grease and line the base of a 4 cup pudding basin
Put an inverted saucer in this bottom of the ceramic pot and pour 1 inch of hot water. Turn on to high.
2. Sift flour into a large mixing bowl, and rub in butter until the mixture resembles breadcrumbs. In a separate place mash bananas, then stir into the flour and butter mixture. Add the sugar and mix.
3. In a clean bowl, add the milk and eggs, then beat into the banana chopped chocolate and spoon in to the prepare pudding basin. Cover with a double thickness of buttered foil and place in the ceramic cooking pot. Pour enough boiling water around the basin to come just over half up the sides.
4. Cover the pot, cook for 3-4 hours, or until the pudding is risen and toothpick inserted comes out clean.

Sunday, August 10, 2008

Rustic Summer Pizza

Every time I go to a restaurant I see a change to get inspiration. Inspiration can be found in the flavors, in the presentation or in the ingredients themselves!
About a month ago I went to file a job application at a new bar that’s opening in Anaheim, California. After filing the paper application and getting no immediate response, I and my faith companion perused trough plaza (near Disneyland). I should mention lunchtime neared and our stomachs growled from hunger. The choice seemed very easy California Pizza kitchen. Hip, hip hurray!!
As we placed our order consisting of … coffee, hummus appetizer, and mushroom pizza… a table tent called my attention. Pear pizza? Hmmmm? It got me thinking. Of course the thought faded as dessert time neared and caramel cheesecake made its way to our table. Delicious!!

The days passed, the calendar pages flying of the wall as they always do. And then yesterday as I cleaned my pantry to go grocery shopping again, a can of pears peered at me, lonely and forgotten. I had cheese in the fridge, tomato, flour, everything set to prepare a pizza. Lovely! My provolone-pear pizza follows:

Ingredients:
1 can sliced pears
10 cherry tomatoes, sliced
1 cup purple cabbage sliced
15 sliced provolone cheese
½ teaspoon thyme
Homemade or prepackaged pizza dough

Procedure:
1. Pre-heat the oven to 350F. Coat a baking sheet with no-stick spray.
2. Roll- out the dough onto the sheet, place the tomatoes in rows, top with provolone cheese, then put pear and cabbage slices alternately on the pizza.
3. Sprinkle with thyme, bake for about 15 minutes until cheese is bubbly and pizza is crispy.

What is the next restaurant dish that can inspire me!!

Thursday, August 7, 2008

Buttercream Beauties


Today has been a great day! I haven’t fought with anyone. I don’t have work tonight, and I stayed home and watched a movie. And if that weren’t enough I had my favorite meals today!
Yep, that’s right, the day started with my comfort bowl of oatmeal and fruit. Then I had homemade pizza, yep from scratch. I made the dough, the ‘sauce’, and baked it for 15 minutes until crispy. Now isn’t that yummy! And right after I finish my post, I am going to my weekly decoration class. Tonight there is no cake involved just frosting. That is not to say I’m not heading over for a coffee and sneaking in some raising bread…
lovely day!! So, since I’m in a hurry, I’ll only post the picture of the beautiful butter cream flowers I made last week. Ahhhhhhh!

Wednesday, August 6, 2008

The "Asian" Flare


Here is my dirty little secret!
I love Asian food more than Mexican (gasp) so, for dinner today I made lovely Asian-inspired tofu and rice. Its pretty simple, to maqe, all it needs is basic ingredients, 30-40 minutes of your time and it can look BOMB on your dinner table!!

Ingredients:

1lb extra-firm tofu (cut and marinated in soy sauce)
1 cup canned, sliced carrots
1 cup canned, sliced potatoes
4 garlic cloves (peeled)
1 cup broccoli (steamed)
2 tbsp olive oil
2 sheets dried seaweed
4 cups boiled white rice
1/2tsp cinnamon
½ tsp cardamom
½ tsp thyme
Salt & pepper

Procedure:
Heat a curved pan (wok). Add olive oil and let it heat up.
Quickly add the carrots, potatoes and garlic. Let it stand for about 5 minutes.
Add tofu and all the sauce it has left, Add spices let stand for another 5 minutes.

Meanwhile roll the seaweed tightly and slice vertically (you’ll get serpentine looking strands.)

Once the tofu is slightly brown and tender, add broccoli stir for another 2 minutes or so.
To plate, scoop rice onto center of plate, square, put tofu around it and put the seaweed on top of the rice.
Enjoy!

Sunday, August 3, 2008

July Favorites

Okay, so I’m a few days late! July is over and gone, but it’s still fresh enough for me to post the favorite things of this month. Being that’s its late summer and peach season, I have to say my number 1 favorite is the
doughnut Peach
It looks sooooooo cute, and tastes delicious. If you’ve tried it Congrats!!! And if not go and buy today!! Another of my favorites this month is Paula Deen’s memoir "It Aint All About the Cookin" Paula Deen - Book And guess what she’s a Georgia Peach (hehe!) It’s a must read, I could not put it down, I mean I was eating and reading! I also discovered this great site about recycling and saving the Earth. If you didn’t know I am (or at least try) to be an environmentalist. So, go see the site and help out mother Earth!!
Earth 911 I also enjoyed going to the gym. I just joined… so I can eat more of those pastries! And last but not least, as the saying goes. The Olive Garden’s noveau “Flat Breads”
OG
“That’s All!”

Thursday, July 31, 2008

The Future Decorator II: Red Velvet Lust


So, it’s Thursday again!! Yep, time for my Wilton decoration class!! I’ve yet to bake today’s cake; however, I first wanted to update on last weeks cupcakes.
I made red-velvet cupcakes, to be honest; it’s the first time I made red-velvet anything. They came out good, although a bit dry for my taste. (No one seemed to notice though!) Yet, making them seemed very fun, specially the part you add, vinegar and baking soda… elementary science fair and culinary combined… I loved the coloring and the smell as it slowly baked in the oven. Yummm, lovely!

Then I frosted them with the usual butter cream frosting, and as the hours began to get near 6:30 PM, I got really exited. I also prepared frosting in three different colors, off-pink, black, and plain pink. All ready!

Mom and me climbed in the car, and decorated our heads off!! Things learned flowers, shells, and free-fall borders. Then our cupcakes could be topped with clowns. So, cute!! And after the class, the cupcakes and me bobbled our way home, to a cup of coffee and talc about next weeks class! Next Thursday I’ll dutifully post about tonight’s endeavors. P.S. It’s time to sign up for Course II!!! Yeah!!

Monday, July 28, 2008

Noveau Cusine

Okay, so it’s not as classy as it sounds. I went to Denny’s the other night; turns out they have some new items after 3AM. Don’t ask why I dinned there at 3AM. The one thing that got my attention was the “Potachos” (a combination of potatoes and nacho topping, no tortilla chips involved). My dinning buddy did not approve. I didn’t try them, what a disappointment, right? LOL

However today, I got crafty in the kitchen and made my own version. I loved them, comfort food in an instant! I don’t quite have a name for them yet… IF YOU COME UP WITH ONE, LET ME HEAR IT!!
They seem humble, but oh, my goodness they are super-duper great. I hope everyone tries them. They are sure to be on the top favorite list, they are in mine! Just follow this recipe!! LISTO!!

Ingredients:

1lb Danish potatoes (sliced)
½ bell pepper (chopped)
½ onion (chopped)
1 tomato (chopped)
4oz smoked mozzarella cheese (grated)
4oz Havarti cheese (grated)
4oz Sharp cheddar cheese (grated)
1 can black beans
3 sheets Matzo crackers (in pieces)

Procedures:

1. Boil the potatoes until tender (do not over boil or they get mushy)
2. In a pan, put the onion, pepper, tomato. Simmer for 3 minutes
3. Add beans and let simmer for about 5 -7 minutes
4. Assemble, matzo on bottom, then potatoes, pour bean mixture over, top with cheeses.
5. Put in microwave for 1-3 minutes until cheeses are melted.
Conventional oven can be used, in a safe container at 300F for about 3-5 minutes.

Serve with hot sauce or sour cream as desired. Share!!

Thursday, July 24, 2008

Healthy Graham Bars

These delicious cookies were taken from an old 70’s book I found in a thrift store. You now from the time communes formed and hippies wanted to convince the world over that veganism as a better life! Good luck!
Being a training chef, a vegetarian, and a food lover at heart I bought it and found in a few good laughs and many good recipes! The book is called The New Laurel’s kitchen, in case anyone feels the need to go thrift store hopping!!
Anyway the recipe seemed a great treat and a healthy one at that, no guilty feelings!! Woo-hoo!!

Graham Cookies (some substitutions by me!)

Ingredients:
16 oz whole wheat flour
4 oz wheat bran
4 oz BeneFiber fiber supplement
1tsp baking powder
½tsp baking soda
¼ tsp salt
6 oz carrot puree
2tbsp Splenda
4 oz soy milk

Procedure:

Stir the dry ingredient together.
Cream the carrots and Splenda; add flour alternately with milk, mixing after each addition.
Chill dough for several hours.
Preheat oven for 350F. Roll dough out thin, directly onto greased sheets, and cut into squares or shapes. Prick with fork and bake 10 -12 minutes until brown.

Wednesday, July 23, 2008

The Future Decorator!!


So, I did some decorating. Last week I attended my fist hands on cake decorating class at a local Michaels. Just as all arts and craft stored do, Michaels offers classes by

Wilton

Now let me tell you that I have always loved decorating, Me and my mom used to do it just modestly, nothing fancy, no decorating bag, or triple star tip. Okay, I didn’t even have an icing spatula, but that’s all ended! I sprung and bought a $90 started kit, that includes piping bags, many tips, spatulas, piping gel, cake cutters, icing tip, colors, cleaners, etc. And they all came enclosed in a beautiful carrier box! I love it to death, I even though about a picture and framing it above my bed… I’m kidding … of course!
So, last Thursday out white iced cake traveled on a display board to Michaels to be decorated. I was really exited! They taught us starts, writing, frames, lines, and design transfer. At the end of the class everyone decorated their cake to their fancy.
I’m proud to say the teacher loved our cake!! I couldn’t wait to eat it!! Mom and me headed across the street to the local Mickey’ D’s and bought two coffees, to share a piece of cake. Then I got home and took those famous pictures.


Tomorrow is the third class!! And this time it’s cupcakes, I’ll tell y’all how they came out later. HOLD ON!

Friday, July 18, 2008

italian cream


My mom bought me The Best of Cooking Light Cookbook, and then browsed through it.
The fist section I wanted to see was the dessert section. I flipped the pages eagerly, lice a teenage girl flips the pages of a high school yearbook. And then I paused mesmerized by all the fruit pies, the chocolate decadent brownies, the compotes and the ice creams. I had died and gone to heaven...
My mother who is much less in love with the sweet side of food, stopped on page 348. She said (very excitedly) “This seems delicious!”
Let me explain something. My mother does not easily fall completely in love with desserts, she much rather have appetizer than dessert (OMG). So if she said she likes a cake, I usually make it for her. This needless to say, did not become the exception. Sadly, on that day buttermilk did not form part of the many boxes and packages in our fridge.
“Let’s do it later,” I said. And then forgot about it.
She did not. On a solo grocery trip she got the buttermilk.
“I got the buttermilk,” were the welcoming words I hear that afternoon as I got home from work.
That same day after dinner the picture became reality.
And so you can make it too, here is the recipe.

Italian Cream Cake

Ingredients:

16 oz sugar
4 oz light butter
2 large egg yolks
16 oz all-purpose flour
1tsp baking soda
8 oz buttermilk
1tsp butter extract
1tsp coconut extract
1tsp vanilla extract
6 large egg whites

Cream cheese frosting
4 oz far-free cream cheese
4 oz butter
1tsp grated lemon
1 tsp vanilla
28 oz powdered sugar

Procedure:
1. Pre-heat oven to 350F
2. Coat 3 (9inch) round pans and line bottom with wax paper. Set aside
3. Combine sugar and butter, beat until blended. Add egg yolks (one at a time, beat after each addition.
Lightly spoon flour into dry measuring cups and level. Combine flour and baking soda Add the flour mixture to cream mixture alternately with buttermilk, beginning and ending with the flour mixture. Stir in chopped pecans and extracts.
4. Beat egg whites at high speed mixer using clean, dry beaters until stiff peaks form. Fold eggs into batter and pour batter into prepared pans. Bake at 350F for 23 minutes. Cool in pans 5 minutes on rack. Peel off wax paper, cool.
(CREAM CHEESE FROSTING)
5. Beat first four ingredients in frosting at medium speed of a mixer until smooth. Spoon sugar into measuring cup, and level with knife. Gradually add sugar to butter mixture and beat at low speed until blended.
6. Place 1 cake layer on a plate. Spread 2/3 cup Cream Cheese Frosting and top with another cake layer. Repeat using 2/3 frosting and end with last cake layer. Spread remaining frosting over sides and top.

And to be fair to cooking light here is the serving info:
1 slice; Calories 290, protein 4.1g, carb 52.3 fiber .5g. Cholesterol 37mg, iron .8mg, sodium 172mg. calcium 38mg.

Wednesday, July 16, 2008

Flan de Elote

Corn bread, corn muffins, corn flan? Yes, it’s a very delicious Mexican tradition. A flan is technically Mexican style custard. It can be flavored, it can fruit it in, caramel on top, or be simple and elegant.
The corn flan is a delicious variation, that I set out to recreate and well, it barely lasted long enough for me to take a picture! Hope you like it!!

Flan de Elote
Source: A Cooks Tour of Mexico

Ingredients:
12 large eggs
2 14-oz cans sweetened condensed milk
3 cups milk
.5 fl oz vanilla extract
1tsp cinnamon
16 oz tender corn kernels
12 oz sugar
4.5 fl oz water

Procedure:
1. Put the eggs and condensed mil in large bowl. Add enough milk to total 2 quarts. Add the vanilla and cinnamon.
2. Pour into a blender container, in batches and blend until foamy.
3. Put the corn in blender and blend just enough to break them. Mix with egg mixture.
4. Put the sugar in a heavy-bottomed pot with a lid. Add the water and swirl the pan, by its handle over medium heat until the syrup comes to a boil and turns clear.
5. Cover pot and raise the heat for about 6 minutes or until sugar is caramel brown. Immediately pour over 12 x 2 in baking dish. Swirl the syrup around quickly to cover entire bottom of the dish.
6. Pour egg mixture over caramel
7. Pre-heat over to 325F. Make a water bath, (about 1in up sides of flan dish.
8. Place water bath in the center of oven and bake for 1-2 hours. When toothpick comes out clean its done. Cool and then refrigerate until ready to serve.


Yield: 12 Servings

Monday, July 14, 2008

Are we Earth's last generation?

It has taken me three drafts to write this post. As a former journalism major I know that the first line is the hardest to write.
Yet, I felt compelled to do this post because the former world that I am used to is crumbling around us.
The U.S. Economy is in the slumps. The “big three” car manufactures have reported major losses; GM leading the line with more than 30%, then Ford. The housing market as every one knows just keeps on falling. And the lending sector that went hand in hand is also suffering major losses. As of today Indy Mac Back has been seized by the FDIC and people lined up by the dozens outside their door. The image brought images from the history books the Great Depression and everyone trying to withdraw their savings.
Retailers and restaurants are not reporting growth and a server at a mid-range restaurant I can vouch for this phenomenon.
If I stray a little from our self-centered country and look more to east I can see the violence and hunger in Africa. There are many countries that are living in poverty unimaginable by us North Americans. I read somewhere that homeless in the United States can be considered well off in comparison. In
Darfur
people, little children of less than 5 work pounding rocks. To exacerbate their misery there is guerilla fighting and political problems. I could go on forever about the many problems that plague that side of our beautiful Earth.
These are all very important concepts; yet, I also wanted to make this blog about the ecological changes in our Earth. I am a big environmentalist. I try to buy local, I try to buy produce in season, I recycle bottles and paper, and all sorts of packaging. I try to use environmentally friendly products, manufacture handbags made from recycled clothes, and plan to intern at
Farm Sanctuary
. But I am also a realist and know that alone I can’t save Earth.
Recently there has been an abundance of movies related to this cause; there is the former vice-president’s documentary
An Inconvenient Truth
Leonardo DiCaprio’s
The 11th Hour!
, CNN’s
Planet in Peril
and many more, I’m sure. The problem is not finding people to sit and watch, the problem is finding people to get up and act.
Are we Earth's Last Generation?

I often find myself wondering if we are Earth’s last generation. The forests are disappearing as I blog, the oceans and wetland are drying and species that in them live are dying. The fields of harvest are over plowed and over used. Big tractors that rampage over the soft land, have replaced the hand that lovingly turned the soil.
And humans have some how lost the connection with our roots.
I hope this motivates you to go and find out how to “go green”; but to do it from the heart and help save the Earth!!

Thursday, July 10, 2008

The Elengant Granita


My last post described how to make ice cream. Today I provide a simpler and lactose free (!!!) alternative. The simple yet elegant Granita.Even the name brings thoughts of dinner parties and five star restaurants. And it’s super delicious! Here is my favorite recipe:

Ingredients:
24 oz raspberry- apple sauce
24 oz water divided
6 oz sugar
6 oz flavored tequila (mango and lime complement the flavor excellent)

Procedure:
1. Combine tequila and apple sauce
2. Combine 8 oz h2o and sugar in a small saucepan; bring to boil; stirring until sugar dissolves. Remove from heat add remaining h2o.
3. Combine raspberry mix and sugar mix, stirring. The dish must be 13 x 9 inch. Freeze 6 hours or until firm. Stir 2 times in the first 2 hours.